While I’m a massive fan and proponent of Hetzner and particularly their Dedicated Servers, one can come across some frustrating oddities here and there. In this case, Hetzner’s MAC Address binding.
This blog post is a writeup and a bit of a guide as to how I eventually managed to get a Proxmox & Hetzner setup the way I wanted. Before we begin, let’s go over some background.
Please note, this post will not go over how to install Proxmox nor OPNsense. It’s very well documented and easy to do.
Background
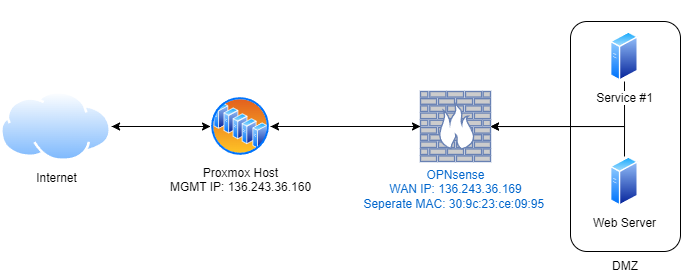
This post will focus on one of my three Promox nodes running on Hetzner’s Dedicated Servers. This specific Proxmox is my “home lab, but in the cloud”. For an overview of how this box is being used:
- Debian 12 (Bookworm) for host OS
- Proxmox Community Edition
- OPNsense as a VM, with a WAN & LAN interface for VMs to talk to another, but also for routing internet traffic inbound and outbound.
- Web servers, openvpn, etc, running as VMs, DMZ’d by OPNsense within Proxmox.
IP Address Requirements
For this setup (bridged), your dedicated server must have two public IPv4s with a virtual MAC address requested for the additional IPv4. This additional IPv4 comes at an additional monthly cost, but can be ordered within Hetzner Robot for the machine. I will be writing a post at a later date as to how you can use masqueraded NAT to achieve the same results with only one IPv4.
An additional MAC address is required because of Hetzner’s strict MAC Address binding. As in, if you have multiple MAC addresses coming from an IP address, Hetzner will send a notification of abuse. This additional MAC address will be assigned to the OPNsense VM within Proxmox. More on that later.
For now, here’s a basic topology:
- IP Address 1: “Management” IPv4 for the Proxmox host itself. Firewalling for this is done via Hetzner’s management console.
- IP Address 2: “WAN” IPv4 for OPNsense, running as a VM within Proxmox. Internet traffic for all other VMs are routed through this IP address. Firewalling is done via OPNsense
| Purpose/Interface | IPv4 | Gateway | Subnet | Broadcast | MAC Address |
|---|---|---|---|---|---|
| Host/eno1 (Dedicated Server) | 136.243.36.160 | 136.243.36.129 | 255.255.255.192 | 136.243.36.191 | N/A |
| WAN/vmbr0 (OPNsense) | 136.243.36.169 | 136.243.36.129 | 255.255.255.192 | 136.243.36.191 | 30:9c:23:ce:09:95 |
Note, these are no longer assigned to me.
Proxmox Host: Network Interfaces
Here comes another frustrating part. I lost hours and hours to this. Rebooting, finding out the interfaces file wasn’t working, having to boot into the rescue image, reconfigure my SSH manager, log in, re-mount the filesystem, revert, and try again. This right here highlighted why I should seriously consider having a server that I can physically access. Give me a console.
I tried maybe 30 variations of modifying the /etc/network/interfaces file on the Proxmox box. Some really complex, some really simple. It turns out, simple is better. Sure, that’s easy to comprehend, however, what an overall pain. Commands like ifreload -a --check, ifquery -a, ifreload -a --dry-run, etc, helped…But you don’t actually know (especially with these sorts of changes) until you reboot, and you know it doesn’t work because you’re now locked out.
Disclaimer
It’s really important to note that this is what worked for me after hours and hours of troubleshooting. Due to the nature of Hetzner Dedicated Server auctions, the interfaces, etc, that your box has, is likely to be different.
Do not just copy and paste the below as verbatim. Carefully review, compare and integrate with the out of the box configuration. I lost a lot of hours to this, just trying other people’s configuration.
It’s imperative that you keep a copy of the “Out of the Box” interfaces file yourself to restore access in case of any errors.
Network Interfaces File
Here is a /etc/network/interfacesthat ended up working for me. Do not copy it verbatim, there are things you’ll need to check and replace, namely, iface name, IP address & network info within vmbr0. I’ve left many comments to explain things to double-check.
cmnatic@hetzner-proxmox-03 ~ # sudo cat /etc/network/interfaces
# /etc/network/interfaces

# Remember, this is on the Proxmox host/Dedicated Server itself.

source /etc/network/interfaces.d/*

auto lo
iface lo inet loopback
iface lo inet6 loopback # Double check if you have IPV6, some dedicated servers do, some don't.

iface eno1 inet manual  # Double check this, your interface name is likely to be different

# Single bridge for both Proxmox Management and OPNsense WAN
# Remember, the Hetzner box only has one physical interface, you do need OPNsense to send traffic out of it
# We will configure IP2 within OPNsense later

auto vmbr0
iface vmbr0 inet static
    address 136.243.36.160 # IP of your Proxmox/Hetzner Host itself. You'll need to adjust this and the netmask, gateway & broadcast below as to what is assigned to you in Hetzner Robot
    netmask 255.255.255.192
    gateway 136.243.36.129
    broadcast 136.243.36.191
    bridge-ports eno1 # Double check this, your interface name is likely to be different. It will be the same as what is provided for "iface xxx inet manual" previously
    bridge-stp off
    bridge-fd 0

# Internal LAN bridge for VMs behind OPNsense
# Any VM we want to put behind OPNsense, we will attach the VM to vmbr100 within Proxmox.
auto vmbr100
iface vmbr100 inet manual
    bridge-ports none
    bridge-stp off
    bridge-fd 0
My advice would be, look at what the current /etc/network/interfaces file looks like on your Hetzner box and adapt around it. Remember to check the interface name. You can use ip addr to see what the network adapter is called on your system and adjust accordingly. In my case, it was en01.
Remember, we have:
| Interface | Purpose | Hetzner Network Details | Interface file provided needs to be changed for your setup? | ||
|---|---|---|---|---|---|
| en01 | Physical network adapter on the box | Yes (use your adapter name) | Yes (see previous) | ||
| vmbr0 | Bridge port to network adapter, so OPNsense WAN can bridge to the interface | Yes | Yes (Use IP,netmask,gateway,broadcast, etc provided by Hetzner Robot ) | ||
| vmbr100 | OPNsense LAN/VM Internal | No | No |
You can, of course, name vmbr100 to whatever, especially if you expect to have complicated network adapters on the Proxmox side of things, but for me, it was just an easy seperation of duty. vmbr0 is OPNsense WAN, vmbr100 is OPNsense LAN. Easy to look at and read when configuring a VM.
I would do some checks via ifreload, etc, but truly the way to check this is by restarting and hoping that you don’t need to boot into a rescue image, mount the FS, and modify the /etc/network/interfaces again.
We will deal with the MAC address shenanigans a bit later within Proxmox itself.
Packet Forwarding
Ensure that IPv4 (and, IPv6, if you plan to use it) forwarding has been enabled in /etc/sysctl.conf. Set the values to 1 to enable it. I.e.
net.ipv4.ip_forward=1
net.ipv6.conf.all.forwarding=1
Additionally, we don’t want our host to be sending ICMP “redirect” requests, at least for this individual setup. Set the value to 0
net.ipv4.conf.all.send_redirects=0
You can restart these by systemctl, but for confirmation and assurance, I’ve always found restarting the server to be the best at this stage.
OPNsense: VM Setup
While I won’t detail the installation process of OPNsense itself, let’s go through provisioning the VM within Proxmox and configuring the network adapters within OPNsense accordingly. Create a new VM and use the OPNsense installer as the OS image. For what it’s worth, here are the specs I assigned to OPNense, granted, in a network that doesn’t have much activity (definitely not production use of OPNsense):
- 2vCPU
- 4GB RAM
- 40GB Disk
When it comes to the “Network” tab, we are going to want to assign the first network adapter to bridge to vmbr0. This will serve as the WAN Interface.
You will want to assign the additional MAC Address (of the 2nd IPv4) given to you by Hetzner here.

This is because all traffic coming to and from this interface (OPNsense WAN) will need to be associated with the additional MAC associated to the secondary IPv4.
Now, before starting the VM, let’s modify the hardware to attach an additional network interface. This interface will use the vmbr100 interface we previously created on the Proxmox host. This will be the LAN interface for OPNsense:
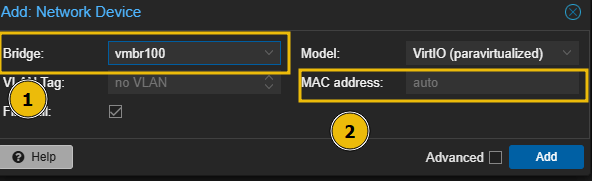
- Assign bridge to
vmbr100in my example, this is the LAN interface we have defined in/etc/network/interfaceson the Proxmox host. - Leave MAC address blank/
auto. We do not care about what MAC address this interface gets.
Now, startup the VM and install OPNsense. The below will cover how we assign interfaces within OPNense.
OPNsense: WAN & LAN Interface Assignment
First, let’s assign our WAN interface and then our LAN interface. You can do this by pressing 1 for 1) Assign Interfaces on your keyboard. Then follow the bulletpoints below:
- Configure LAGGs now?: No
- Configure VLANs now?: No
- Enter the WAN interface: We will want to enter
vtnet0, or, the interface that has the additional MAC address from Hetzner assigned to it. - Enter the LAN interface: Enter
vtnet1, or the automatically generated MAC address from Proxmox. - Enter optional interface: Press
Enterand provide nothing, for this setup.
OPNsense: Interface Configuration
Now, we’ll want to assign some information for both the WAN & LAN interfaces. For LAN, you’ll want to select the IP address range, subnet mask, etc, that you’d like to use for VMs that will sit behind OPNsense. You have total freedom over this.
Let’s go through configuring the WAN interface:
- Configure IPv4 address WAN interface via DHCP?: No, we will be statically assigning ourselves.
- Enter the new WAN IPv4: Enter the additional purchased IP from Hetzner. In my example, this will be
136.243.36.169, remembering that the Proxmox host is136.243.36.160 - Enter the new WAN IPv4 subnet bit count: 26. We will need to use the subnet mask assigned to that additional IPV4. We use /26 CIDR because of how Hetzner networking works. Whilst the IP is a single host, the Gateway is amongst the /26 subnet
- For a WAN, enter the new WAN IPv4 upstream: Set this to the gateway of your additional IP. In my case, this is
136.243.36.129 - Do you want to use it as a default IPv4 gateway? Yes
- Do you want to use the gateway as the IPv4 name server, too? Yes
- Configure IPv6 WAN interface? This will depend on your setup. I use only IPv4 only in this example.
- Proceed with the rest of the options as you decide fit.
OPNsense & Hetzner: Ephemeral Port Range & Hetzner Firewalling
Now, remember that the Hetzner Firewall provided within Robot is stateless, and if I’m honest, can be a bit annoying to work with. I use Hetzner’s Firewall to:
- Accept all traffic for the OPNsense WAN IP (
136.243.36.169). Use something much more sophisticated like OPNsense to decide what goes on. - Firewall the Proxmox’s IP (
136.243.36.160) for only myself and very certain specific exceptions.
Due to how Hetzner’s firewall works. We will need to explicitly allow TCP & UDP ephemeral traffic. And, this caught me out at first, we have to use the range of OPNsense’s OS.
For reference, I had some weird packet loss to the WAN IP on OPNsense. This is what the issue/fix was, for me, at least.
TCP/UDP Ephemeral range will vary based upon the OS. For example, FreeBSD (OPNsense) is 1024 - 65535, where, Debian, for example, would use 32768-61000 by default.
Be sure to put these at the top of your Hetzner Firewall, as it’s priority based. Additionally, remember to set the TCP Flag for the TCP Ephemeral rule to ack.

You can, alternatively, tell OPNsense to use a different ephemeral range. Up to you.
OPNsense: WebUI Configuration
With all of that done, access the WebUI of OPNsense. I personally done this to start with by having a Ubuntu Desktop VM, where the VM’s network adapter was set to vmbr100 to obtain an IP from the LAN interface of OPNsense. And later, an OpenVPN service.
Verify that all of the assignments for WAN & LAN interfaces under Interfaces are correct, especially the default gateway assignment & MAC address for the WAN interface. You may have to manually type this out on the interface and save.
Additionally, feel free to set the DNS routes for the LAN clients via DCHP.
OPNsense: Firewall
You will need to use the firewalling/port forwarding under NAT -> Port forward if you wish to port forward anything such as a web server, etc.
Final Remarks
Hopefully this helps! For me, the hours of trouble was getting the /etc/network/interfaces and Hetzner (I.e. TCP/UDP ephemeral) correct. Configuring OPNsense and henceforth was the easy part.
Again, this is what worked for me. I have 3 Hetzner Dedicated Server boxes, all running Proxmox, and they individually required some configuration, particularly on the Proxmox host side of things.